Aug 30, 2012

Optimus Prime Pen on the moon base... Part5-3

5-3 Make the mold of moon base (continue)

Well even I got not much time for making this project and also this present, but will do my best. Now we're making mold (the core side)

assemble PP board back to the same position (as we've marked).
Set the height around 2 cm from silicone base. Then coat all silicone area with vaseline.
If you forget vaseline... you will need to jump out from building ToT

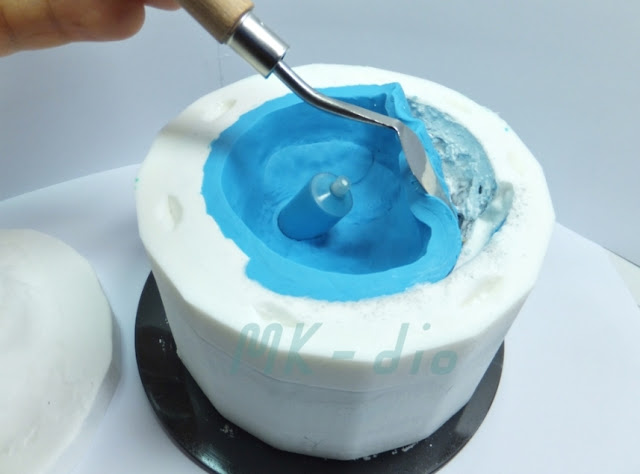
Use silicone (hard type) pore onto the whole area.
Start from edge around and spread out by air gun.  

This step spends lots of time to make thin layer each.

make more layers until you can't see the blue color. Then it should be thick enough.

Finished with 4 layers. Wait till completely dry (~3 hrs) up to the silicone property.

Once silicone was completely dry. Pore plaster as per photo start from center.

thickness = 1.0-1.5 cm from silicone base is enough

Check if it's flat and smooth. Then wait for 1 day for plaster set completely dry.

Unwrap PP board, cut the exceed silicone. Mark each position well.
We got 4 pcs of mold completely.

disassemble it to check if details, dimple shape, are ok.
Then get ready to remove all plasticine.

We will not use this shape anymore, then remove the whole plasticine, plaster shell.


Remove all plasticine letters and check if they are complete. If not,
plan to fix them by soft silicone type. Now I trim the exceed silicone.
You will know your skill of making silicone by this result.

And also check if there are any weak rips around letters. if yes, fix them by soft silicone.

ahhh. this was one of much time I spent. Remove them all. For sticked sand, no need to remove. just leave them there. no any effect to resin process.

The upper and lower mold are complete.

That is to say, gap in between both ~ 5-6 mm. thickness is our work piece.

Not sure if this present is good enough to understand what it is.
anyhow, it is soon will be.
Enjoy?
bye for now. ^)^

Optimus Prime Pen on the moon base... Part5-2

5-2 Make the mold of moon base (continue)

Previously we got this part, to get ready to make silicone mold of the left side. 
Flip it bottom up

we must take all our prototype out (foam, plaster, some of plasticine)

cut it carefully, do not cut reach silicone at bottom.


do not take plasticine plate out (it hold all dimension of fonts well)

remove some thick plaster out, if difficult no problem for this step just leave it.

it is enough for me. now be ready to make our work piece thickness.


to ensure that 2 side of mold will be locked each other. I will make the lock dimples.

5-6 dimples is much enough, make sure there is no undercut at all.

now make the thickness of our work piece by layering plasticine.

due to syringe already has 4 mm thickness then no need to make layer.

start 2nd layer, try to lay down completely then make it smooth.

this way makes you to ensure that you will have the right thickness. otherwise you will never know the desire thickness at all.

trim around

 if you reach this step, you can ensure that you will be able to make silicone
of this side as well.

See... custom work is not too difficult at all now!
hope you enjoyed this present
thanks for watching

Bye for now ^^

Aug 28, 2012

Optimus Prime Pen on the moon base... Part5-1

5-1 Make the mold of moon base

mix the soft type silicone (slow drying) to make 1st layer. Put it into fonts carfully.
to use small brush is recommended.

always sweep the bottom silicone up to the fonts, to ensure that fonts are covered.

  Once 1st layer is dry. make 2nd layer.

Now consider all undercut areas. try to cover all undercut areas.

Look at top view to see any undercut area appears. From this picture you can find some.

Cover undercuts remaining completely, cut the exceed silicone as circle profile.
then we will make the thickness of silicone at bottom around 1cm. 
(this is to protect plaster touch togehter in next process)

Make the circle wall (use PP board) by half cut 2cm each section, wrap it with tape.

Ensure that the wall is higher than the top of silicone, otherwise you will cry for sure ^^

just to check the gap around, 1mm is good enough. Then take it out.

due to silicone may leak out at bottom as gravity force. then we will solve this easily by sealing around with plasticine.

use any plate to press it, just to ensure all positions are pressed the same force.

check if any air gap remain. if not go ahead on silicone to make bottom silicone.

lay silicone (hard type) around, do not need to use brush beause it will flow down
at bottom completely.

it should be 1 cm heigh from bottom is enough. Wait it till completely dry.

Pore plaster till 1.5-2 cm higher than the top of silicone work piece.
(now you know why the wall needs to be higher than top of silicone ^^)

Do not forget to mark the position. We will use this wall again at opposite side. Wait plaster to be dry ( 1 day at minimum)

unwrap the wall, cut the exceed silicone, exceed plaster.

it looks ok.

open it up to checck every details. For this photo looks good.
Then get ready for next step.

the more challenge is coming up on next part.
hope you are enjoy it more or less.
thanks for watching.
bye for now! ^o^